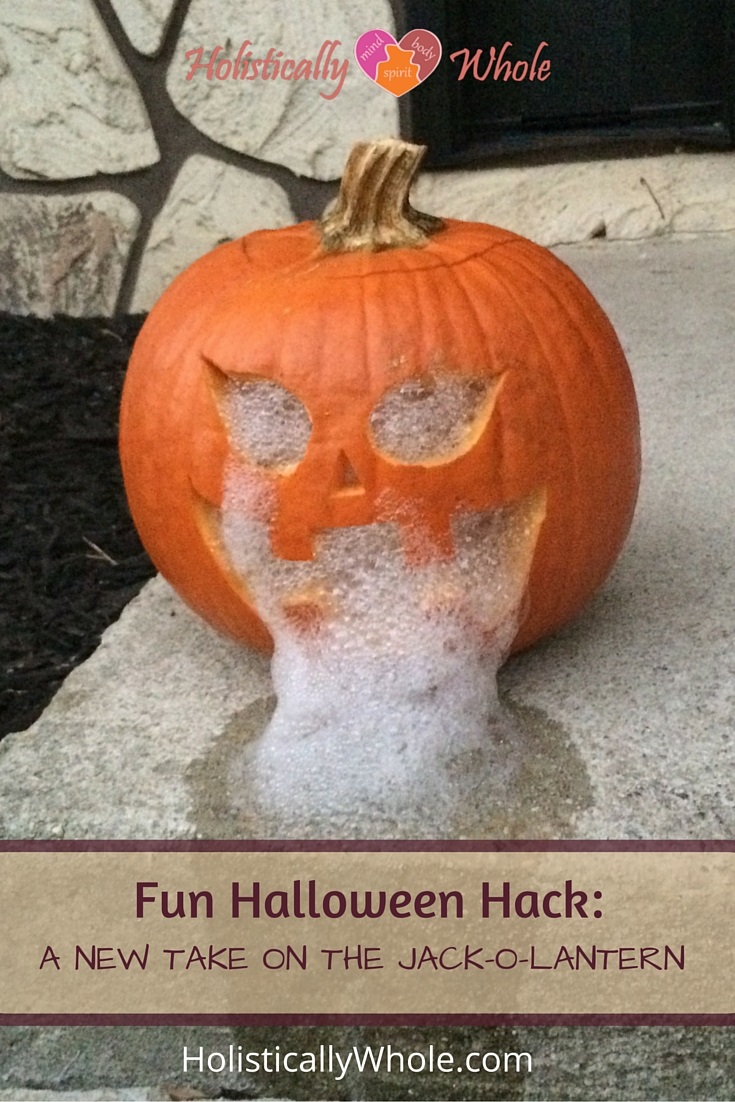
I love Halloween! But, as you all know, I’m very lazy busy. And autism can make Halloween activities a challenge. I wanted some fun ideas that I could do with my kids. So, I present … the Bubbling Pumpkin Face Halloween Hack (which is a new take on the classic Jack-O-Lantern). This is such a cool idea, and it’s so easy. I got the idea from this Crazy Russian Hacker Halloween Edition video, which has other fun Halloween ideas too. I’ll be posting some other neat-o Halloween crafts during the weeks leading up to Halloween, so stay tuned!
What You’ll Need
- Medium-large/Large sized pumpkin
- Pumpkin carving and scooping tools (knife/ves, big spoon, newspaper or trash bags, etc.)
- Glass of water
- Dish soap
- Dry Ice
Just in case (like me) you’ve never bought dry ice, you can get this at the grocery store, but I recommend calling first. Not every grocery store has it, and it took me about 3 tries. I heard Walmart (or at least some Walmarts) has it too. I got mine at a Giant. They only had one size (about 6 in. x 6 in., and it felt like about 5 lbs.) and it cost about $10. I also didn’t realize that I couldn’t just throw it in the freezer. When I looked at it the next day (after we used some of it for this project), it had kind of “fallen out” of the bag and icy pieces were all over the freezer. So, apparently it evaporates very quickly.
Just in case you’ve never carved a pumpkin before, here is a quick tutorial. Put your pumpkin on a trash bag, newspaper, or tarp and cut the top off.

the kids were fascinated by the pumpkin guts
Then, use a big spoon to scoop out all the guts. Get rid of the guts!

this seemed like a funnier idea in my head…
Then, carve out a super spooky face and you are good to go.

our “eyeballs” didn’t last very long
Now, for the good part – here is how you make your pumpkin puke bubbles. First, you need to chip off some dry ice. Unless you let it melt awhile, it’s going to be pretty hard. So, the best thing to do is to use a hammer and a screwdriver to chip it away and it will be really easy. You should also wear gloves (or pull your sleeves over your hands) while handling the dry ice. It is really cold, so you can easily get freezer-burned.

Get a glass – we used a 16 oz mason jar, available here (affiliate link) and fill it about 3/4 with water. Then add dish soap (the kind to hand-wash dishes, not the kind that goes in the dishwasher). We put LOTS in. I think we put too much in, but you can decide how bubbly you want your pumpkin to be.

Stir the dish soap into the water. You probably don’t need to stir as long as we did, but everyone needed a turn…

Place the glass inside the pumpkin. It might slip around when it’s in there, so make sure it will stay upright where you put it.

Add the dry ice into the glass. Again, handle CAREFULLY. You should probably be more careful than I was, letting my kids put their sleeves over their hands. For the record, no one was injured in any way. I just want to make sure that no one reading this gets hurt.

Put the top of the pumpkin back on (you want the bubbles to come out of the face holes and not the top).

Here is our short video of our spooky bubbly pumpkin after we did all of the above. It actually is pretty cool. The kids loved it.
If you just want to make your pumpkin smoky (and not bubbly), you can eliminate the dish soap and just put the dry ice directly in the glass of water. We tried it later that night and it looked like this (also pretty cool):

Happy Halloween!
Please keep checking back at HolisticallyWhole.com/blog for more Halloween Hacks in the upcoming weeks, and please share your favorite Halloween crafts as well!
 My autism journey has changed the way I live and care for my family. I am passionate about nontoxic products, natural remedies, grain-free nutrition, essential oils, and healing the symptoms known as autism. This is a space for anyone aspiring toward cleaner, healthier living.
XO Joanna
My autism journey has changed the way I live and care for my family. I am passionate about nontoxic products, natural remedies, grain-free nutrition, essential oils, and healing the symptoms known as autism. This is a space for anyone aspiring toward cleaner, healthier living.
XO Joanna